Routes
This guide walks you through creating and maintaining Routes in TradeStack. A route describes a delivery corridor your vehicles run regularly and the customer locations along it. Every Trip is planned against a route, so getting your routes right makes it much quicker to pick the right Delivery Orders and the right vehicle for each trip.
Routes sit between customer set-up and trip planning. Before you build a route, the customers and locations it serves must already exist and be approved — see Customers & Locations. For how routes fit into the full delivery journey, see the Trip Lifecycle overview.
1. What is a Route?
A Route is a named delivery corridor. It has:
- a Name — e.g. "Nairobi North" or "Thika – Murang'a";
- an Origin — the branch, depot or warehouse of your own where the route starts;
- a Destination — the branch, depot or warehouse of your own where the route ends (this can be the same place as the origin, for a loop that returns to base);
- an optional Description;
- a list of Customer Locations the route serves.
Route "Nairobi North"
  Origin:       Nairobi Main Depot
  Destination:  Nairobi Main Depot
  Serves:       Mavuno Westlands · Mavuno Thika Road · Kahawa Mini-Mart · Ruiru Wholesalers
A few things a route does not have, which are worth knowing up front:
- No status or approval. A route is usable as soon as you create it, until you deactivate it.
- No stop sequence. The customer locations are a list, not an ordered itinerary. The order in which a driver visits them is decided on the day, not by the route.
- No exclusivity. The same customer location can belong to as many routes as you like.
A route is a planning guide, not a hard restriction. It helps the system suggest the right Delivery Orders and vehicles for a trip, but it never stops you adding an order outside the route (see Section 8).
2. Before you start
| Requirement | Details |
|---|---|
| Logged-in branch and territory | Route screens need you to be logged in to a branch and territory. |
| Permissions | VIEW_ROUTE to see Logistics → Routes; ADD_ROUTE to create routes and add customer locations; CHANGE_ROUTE to edit and deactivate; DELETE_ROUTE to remove customer locations from a route (see Section 10). |
| Your depots set up | Origin and Destination list only your own branches, depots and warehouses. If the place you need isn't listed, ask your administrator to set it up first. |
| Approved customers with Active locations | Only Active locations of Approved customers can be added to a route. See Customers & Locations. |
| Route manager user types (optional) | To assign route managers, their user type must allow managing routes (see Section 6). |
3. Viewing routes
Open Logistics → Routes. The list shows every active route in your organisation.
| Column | Shows |
|---|---|
| Route | The route name, its description, and its distance if recorded |
| Origin | Where the route starts |
| Destination | Where the route ends |
| Edit | Opens the edit wizard |
| Details | View opens the route's details page |
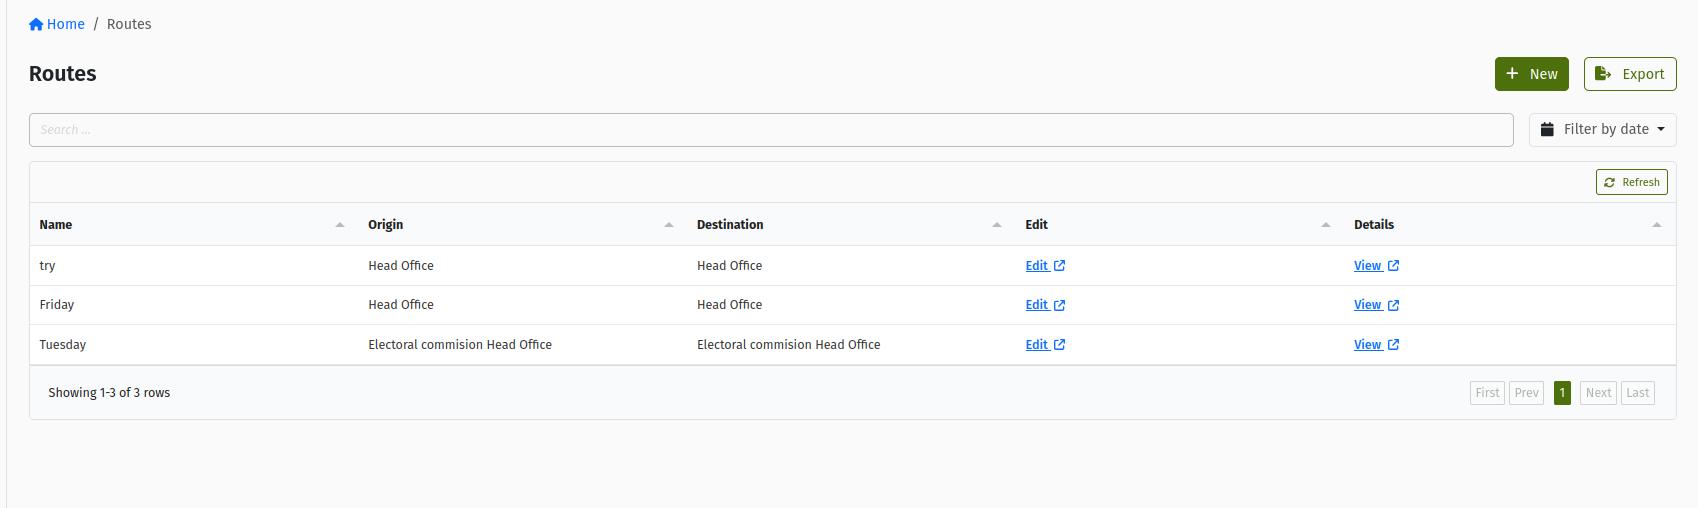 The "Routes" list with the + New button and the Route, Origin, Destination, Edit and Details columns.
4. Creating a route
Creating a route is a two-step wizard: 1 Route Details, then 2 Customers. You save the details first, and then add the customer locations.
Step 1 — Route Details
- In Logistics → Routes, click + New.
- The Create Route page opens. Step 2 Customers is locked with the message "Save the route details first — you'll add customer locations here right after."
- Fill in the fields:
| Field | Required? | Meaning and rules |
|---|---|---|
| Name | Yes | A clear name for the corridor. Must be unique among your organisation's active routes — otherwise you'll see "A route with this name already exists in this organisation." |
| Origin | Yes | Where the route starts. "We've filtered the list to show only your branches, depots, and warehouses." Options show as "Branch name: (address)". |
| Destination | Yes | Where the route ends. Same list as Origin. Pick the same depot as the origin for a round trip. |
| Description | No | A short note on the corridor — the area covered, the main road, the delivery days. |
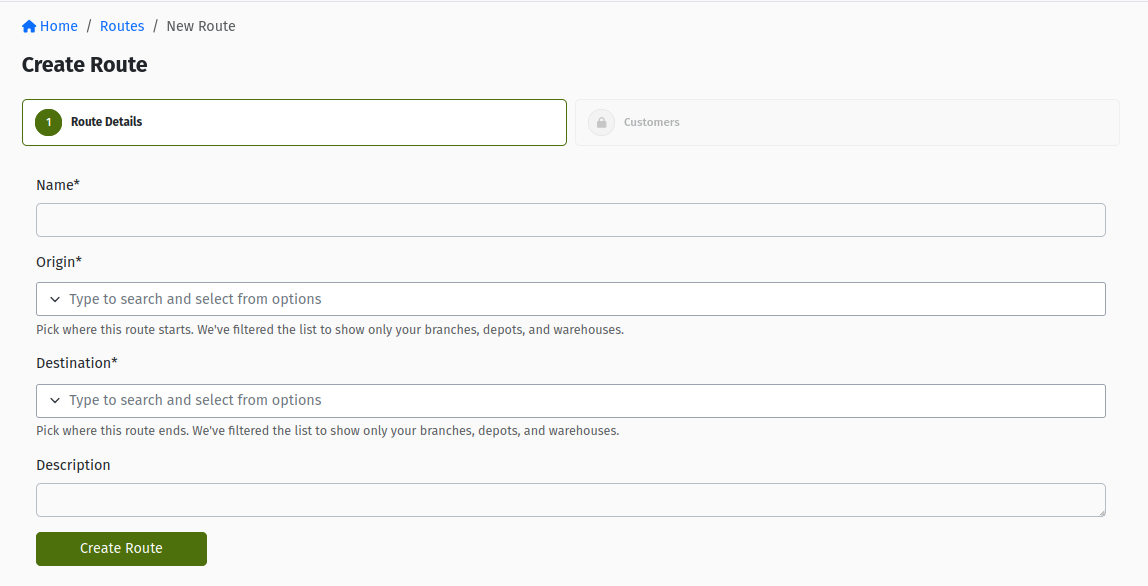 The "Create Route" page on step "1 Route Details", with the Name, Origin, Destination and Description fields, step "2 Customers" locked, and the Create Route button.
- Click Create Route. The route is saved and the wizard moves straight on to the Customers step.
Step 2 — Customers
On the Customers step you build the list of customer locations the route serves.
- Click the search box "Search a customer location to add..." and type part of the customer name or address.
- Select the location from the results.
- Click + Add Customer. You'll see "Customer location added to route." and the location appears in the table below.
- Repeat for each location the route serves.
- Click Done when you've finished.
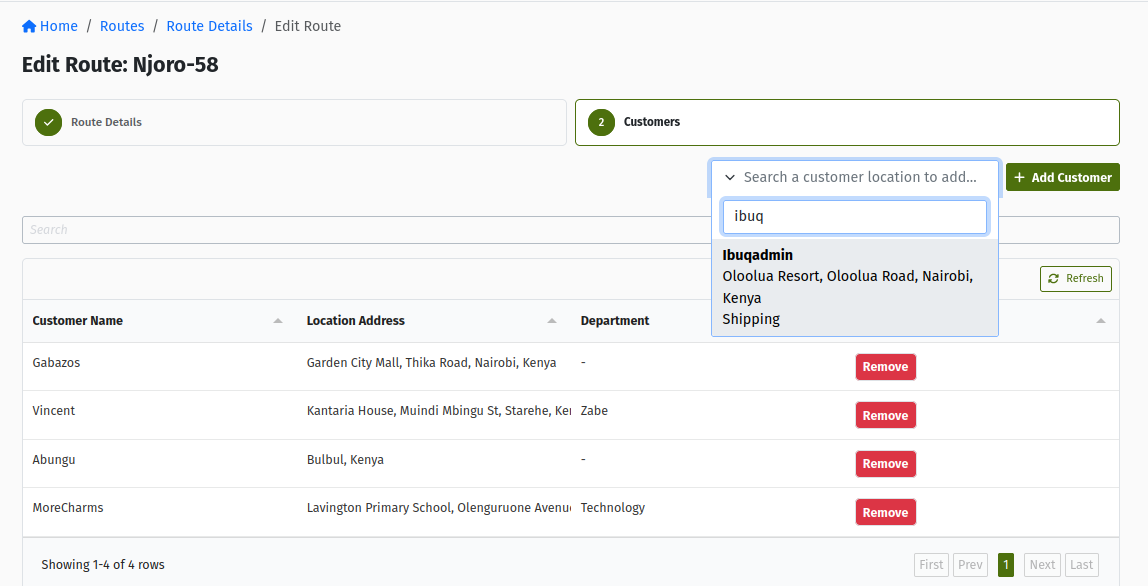 The route wizard's "Customers" step — the "Search a customer location to add..." box with results open, the + Add Customer button, and the table with Customer Name, Location Address, Department and Remove columns.
What the search offers you:
- Only Active locations of Approved customers. If a location you expect is missing, check that the location is Active and the customer is Approved — see Customers & Locations.
- Locations already on this route are left out, so you can't add one twice.
- Locations that are already on other routes are offered — a location can sit on several routes.
If you click + Add Customer without picking a result first, you'll see "Search and select a customer location first." Select a location from the dropdown, then click the button.
Customer locations are added and removed immediately — there's no separate save for this step. Done simply closes the wizard.
5. Viewing and editing a route
Click View on the routes list to open a route's details page. The header shows the route name with the Edit Route and Deactivate Route buttons. Below it are three tabs:
| Tab | What it shows |
|---|---|
| Details | Origin, Destination, Total Distance (when one has been recorded), the creation date, and a map |
| Customers | The customer locations on the route — the same panel as the wizard's Customers step, so you can add and remove here too |
| Managers | The users assigned as managers of this route |
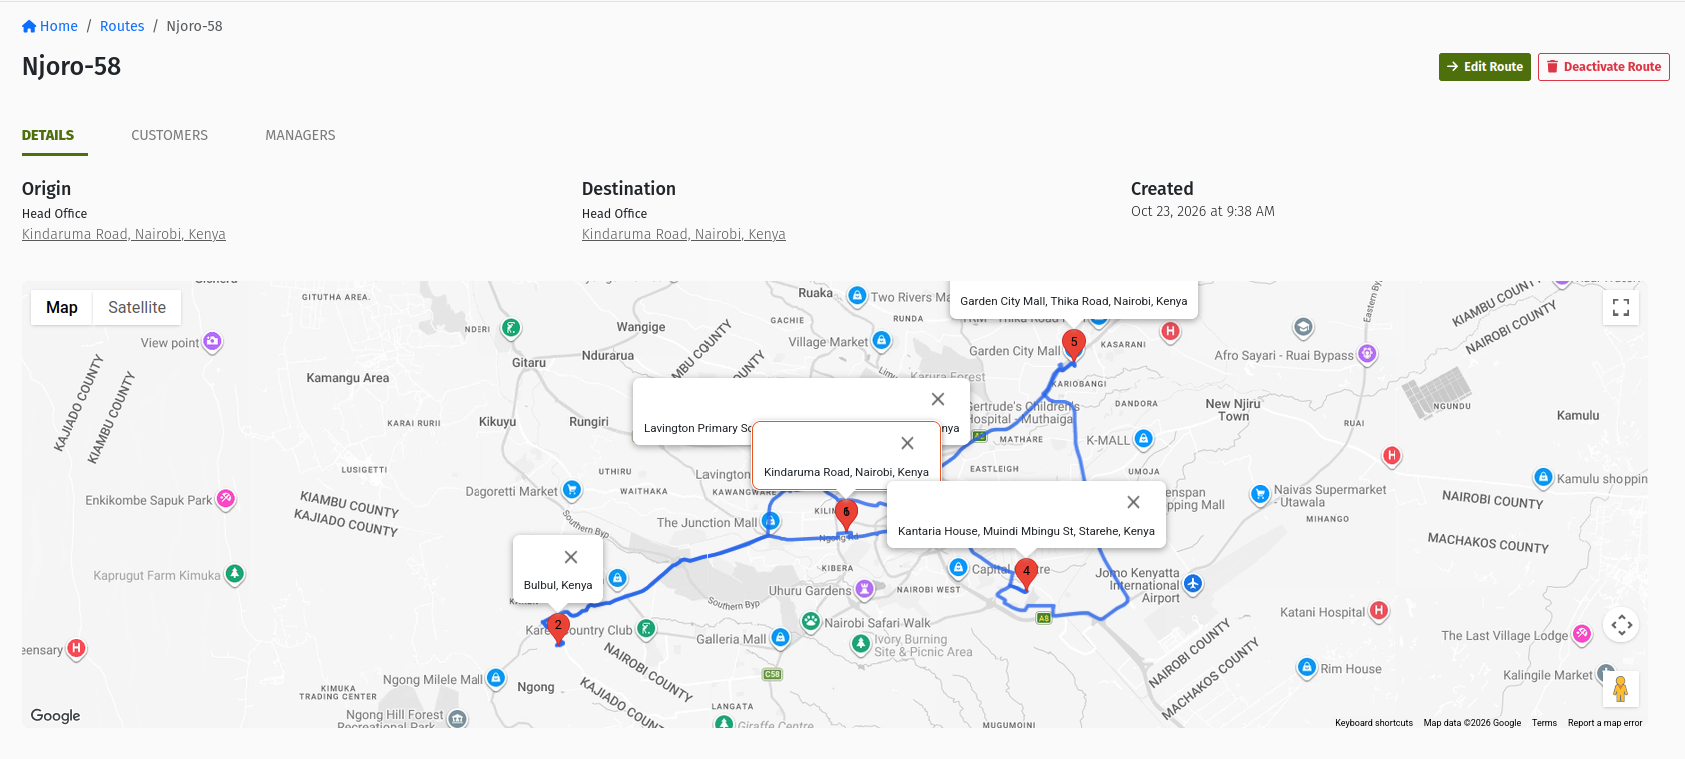 A route's details page on the "Details" tab, showing Origin, Destination and the map, with the Edit Route and Deactivate Route buttons in the header.
Editing route details
- Click Edit Route (or Edit on the routes list).
- The Edit Route: … wizard opens on Route Details. Change the name, origin, destination or description.
- Click Update Route. The wizard stays open, so you can carry on to the Customers step or leave the page.
Trips are linked to the route itself, so a change such as a new name shows on every trip planned on that route, including existing ones. If a corridor has changed completely, it's often clearer to create a new route than to repurpose an old one.
Removing a customer location from a route
- Open the route's Customers tab (or the wizard's Customers step).
- Click Remove on the location's row.
- Confirm "Remove customer location?" by clicking Yes, remove. You'll see "Customer location removed from route."
Removing a location from a route doesn't affect the customer, the location itself, or any Delivery Orders for it — it only takes the location off this route's list.
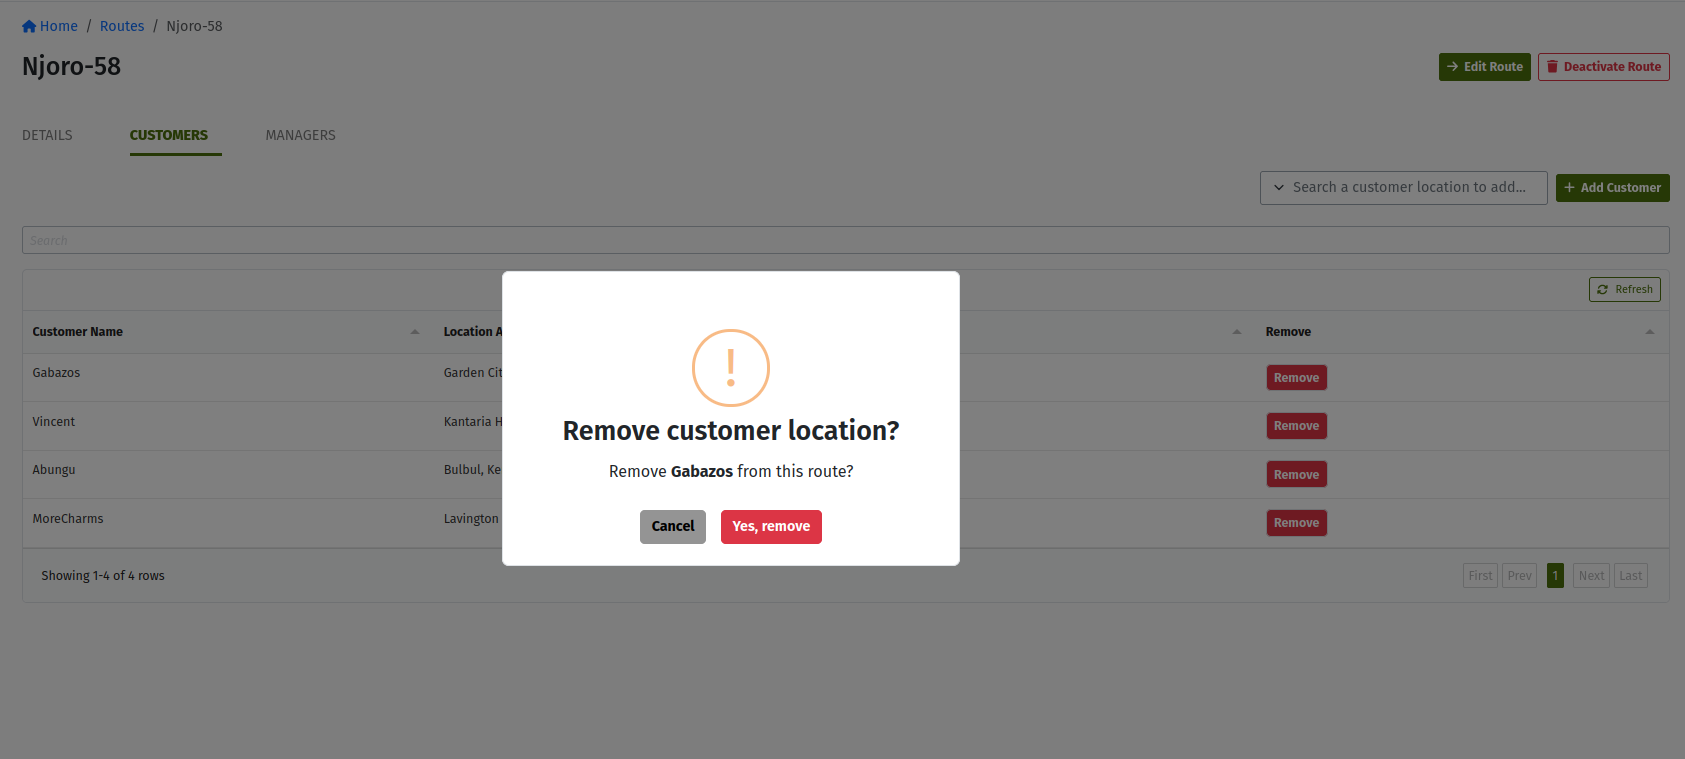 The "Remove customer location?" confirmation with the Yes, remove button.
6. Route managers
Each route can have one or more managers — the people responsible for that corridor. Recording them makes it easy to find a route's work: for example, the Add order to trip screen on a Delivery Order lets you filter trips by route manager.
To assign a manager:
- Open the route's Managers tab and click New.
- The Assign Managers to Route page shows the route name with its From and To points.
- Choose a user and click Save Manager Assignments.
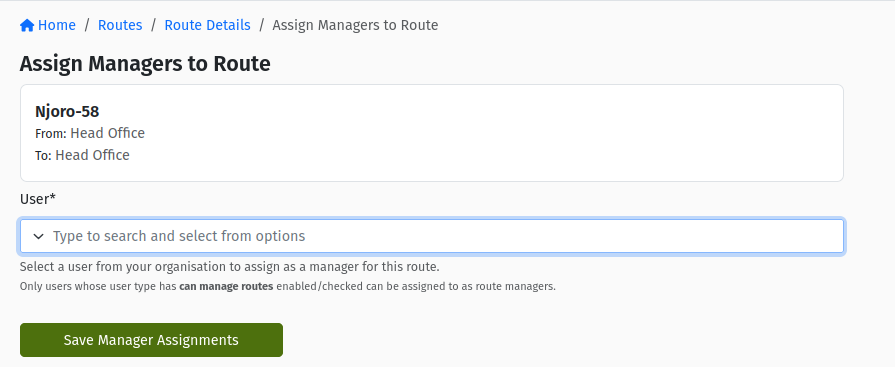 The "Assign Managers to Route" page with the route summary (From / To), the user dropdown and the Save Manager Assignments button.
The Managers tab lists each manager with the Assignment Date, Manager name and Email.
Only users whose user type allows managing routes appear in the dropdown. If someone is missing, an administrator must open that user type's settings and tick "Yes, allow users of this type to manage routes".
7. Deactivating a route
When a corridor is no longer used, deactivate its route so it stops being offered for new trips.
- Open the route's details page and click Deactivate Route.
- The Confirm Delete page explains: "Once deactivated, this route will no longer be available for planning, customer assignments, or dispatching." and "This action cannot be undone."
- Click Delete to confirm, or Cancel to go back.
Deactivating removes the route from the routes list and from the Route choices when creating trips. Its customer location assignments are removed with it; the customers and locations themselves are not affected.
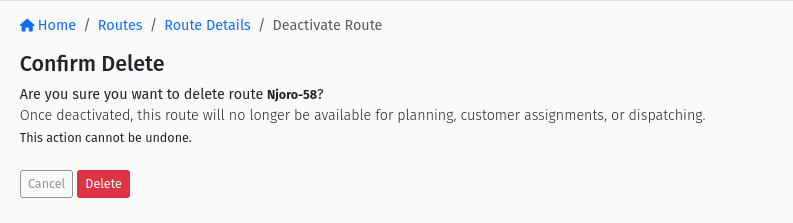 The "Confirm Delete" page shown after clicking Deactivate Route, with the Cancel and Delete buttons.
Deactivation can't be undone — if you need the corridor again you'll have to create a new route and add its locations again. Only deactivate a route once all trips planned on it are finished. If the corridor has just changed shape, edit the route instead.
8. How routes shape trip planning
Every trip needs a route
When you create a trip, the first step (Route Details) asks for a Route — it's required, and only active routes are offered. Once you move on to the vehicle step, the route is shown read-only: a trip's route is fixed when the trip is created. If you picked the wrong route, cancel the draft trip and create a new one. See the Trips guide.
Which Delivery Orders you see when adding orders to a trip
On the trip's Trip Orders tab, the route decides which Delivery Orders are put in front of you — but it never blocks an order:
- The orders table opens with its route filter pre-set to the trip's route, so you first see orders whose destination is one of the route's customer locations.
- Clear the route filter to see every eligible order. Orders whose locations are on the route are listed first; the rest follow with an Outside Route tag.
- You can add orders tagged Outside Route just like any other — the tag is a reminder that the driver will need to leave the usual corridor.
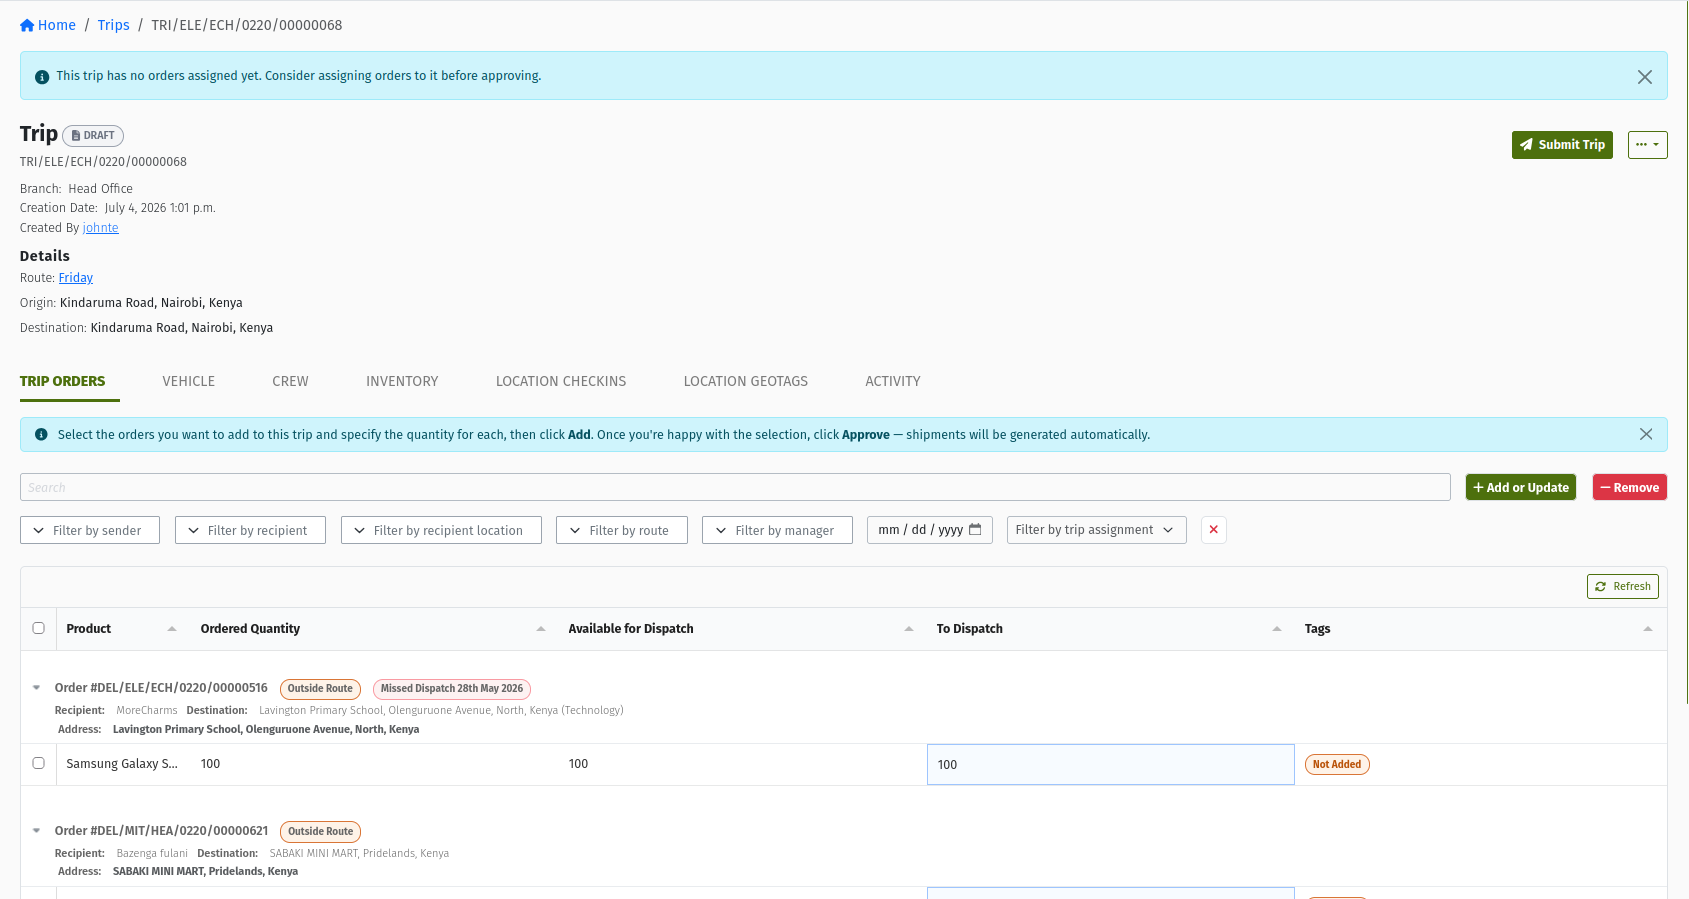 A Draft trip's "Trip Orders" tab with the route filter cleared, showing on-route order lines first and lower rows carrying the "Outside Route" tag.
The orders offered still have to meet the normal rules — for example the Delivery Order must be Approved (or In Progress with quantity still to dispatch) and belong to your logged-in branch and territory. Those rules are explained in the Delivery Orders guide and the Trips guide.
If your dispatchers regularly see many Outside Route orders for a route, it's a sign the route is missing locations. Add them to the route so they're listed first next time.
Filtering by route elsewhere
Routes are also used as a filter in several lists — for example the Delivery Orders list (by the order's destination), the Add order to trip screen on a Delivery Order (by route and route manager), and the Loading Requests list.
9. Routes and vehicles
Preferred routes
Each vehicle can record the routes it normally runs. Open the vehicle in the Vehicles app, go to its Routes tab, and choose its preferred routes ("Choose the routes this vehicle normally operates on."). See the Vehicles guide.
Preferred routes only sort the vehicle dropdown when you assign a vehicle to a trip:
Vehicle ▾
  Preferred for this Route
    KDA 123A (Isuzu FRR) - AVAILABLE
  Other Vehicles
    KDB 456B (Mitsubishi Canter) - AVAILABLE
    KDC 789C (Isuzu NQR) - RESERVED
You can still pick any vehicle from Other Vehicles — preferred routes never restrict your choice.
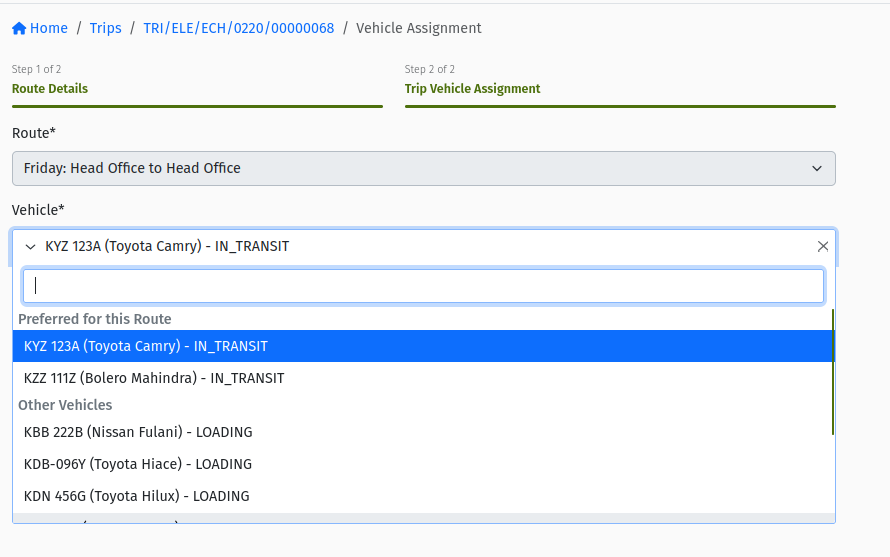 The trip's "Trip Vehicle Assignment" step with the Vehicle dropdown open, showing the "Preferred for this Route" and "Other Vehicles" groups.
Active route
A vehicle's active route is set automatically: when you assign a vehicle to a trip, the vehicle's active route becomes that trip's route. If the trip's vehicle is changed, the old vehicle's active route is cleared and the new vehicle takes it over. You never set it by hand. The vehicle's page shows the latest assignment, e.g. "Recently assigned to route … for trip …".
10. Permissions reference
| Permission | Controls |
|---|---|
VIEW_ROUTE | Seeing Logistics → Routes, the routes list and route details. |
ADD_ROUTE | Creating routes (+ New, Create Route), adding customer locations, and assigning managers. |
CHANGE_ROUTE | Editing routes (Edit Route, Update Route), assigning managers, and Deactivate Route. |
DELETE_ROUTE | Removing customer locations from a route. |
Preferred routes are edited on the vehicle, so they need the vehicle permissions ADD_VEHICLE or CHANGE_VEHICLE rather than a route permission.
11. Common mistakes and troubleshooting
| Message / symptom | Cause | What to do |
|---|---|---|
| "A route with this name already exists in this organisation." | Another active route has the same name. | Use a more specific name, or edit the existing route instead. |
| The place I need isn't in the Origin / Destination list | The list only shows your own branches, depots and warehouses. | Ask your administrator to set up the depot. Customer locations are added on the Customers step, not here. |
| A customer location doesn't appear in "Search a customer location to add..." | The location isn't Active, the customer isn't Approved, or it's already on this route. | Activate the location and approve the customer (Customers & Locations); check the route's Customers table. |
| "Search and select a customer location first." | + Add Customer was clicked before a location was selected. | Pick a result from the dropdown, then click + Add Customer. |
| A user I want as route manager isn't in the dropdown | Their user type doesn't allow managing routes. | Ask an administrator to tick "Yes, allow users of this type to manage routes" on that user type. |
| I picked the wrong route for a trip | A trip's route is fixed once you've moved past the first step. | Cancel the draft trip and create a new one with the right route. |
| An order I need isn't in the Trip Orders table | The route filter is pre-set to the trip's route. | Clear the route filter; off-route orders appear with an Outside Route tag. |
| A vehicle I expected isn't under "Preferred for this Route" | The route isn't in that vehicle's preferred routes. | Pick it from Other Vehicles, and add the route on the vehicle's Routes tab for next time. |
| A deactivated route has disappeared | Deactivation is permanent. | Create a new route and add its customer locations again. |
12. Best practices
- Name routes for the corridor, not the driver. "Nairobi North" stays meaningful when staff change; "John's route" doesn't.
- Keep the customer list current. Add new branches as soon as their locations are activated, and remove locations that have closed, so the Trip Orders table lists the right orders first.
- Overlap is fine. If a location is served by two corridors, put it on both routes.
- Set preferred routes on your vehicles. It saves dispatchers scrolling through the whole fleet for every trip.
- Edit rather than deactivate. Deactivate only when a corridor is truly retired and no trips on it are still running.
- Watch the Outside Route tag. Frequent off-route orders mean the route needs updating.
13. Worked example
Your Nairobi depot serves customers north of the city several times a week.
- Open Logistics → Routes and click + New.
- Enter Name "Nairobi North", set Origin and Destination to "Nairobi Main Depot", and Description "Thika Road corridor – Mon/Wed/Fri". Click Create Route.
- On the Customers step, search "Mavuno" and add Mavuno Westlands and Mavuno Thika Road, then add Kahawa Mini-Mart and Ruiru Wholesalers. Click Done.
- On the Managers tab, click New and assign the area supervisor.
- In the Vehicles app, open truck KDA 123A and add "Nairobi North" to its preferred routes.
- On Monday, create a trip on route "Nairobi North". On the vehicle step, KDA 123A appears under Preferred for this Route. On the Trip Orders tab, the four Nairobi North customers' approved orders are shown first. A one-off order for a shop in Juja, not on the route, appears with an Outside Route tag once you clear the route filter — you add it too, and the driver makes the detour.
14. Quick reference
| Step | Action | Watch out for |
|---|---|---|
| 1 | Logistics → Routes → + New | Name must be unique among active routes |
| 2 | Choose Origin and Destination, Create Route | Only your own branches, depots and warehouses are listed |
| 3 | Search and + Add Customer for each location | Only Active locations of Approved customers are offered |
| 4 | Assign managers on the Managers tab | User type must allow managing routes |
| 5 | Set preferred routes on vehicles | Only sorts the vehicle dropdown; doesn't restrict it |
| 6 | Use the route when creating trips | The trip's route can't be changed after the first step |
Status meanings
Routes have no status of their own — a route is either in use or deactivated. The statuses that matter when building a route are those of the records you add to it:
- APPROVED customer + ACTIVE location — can be added to a route.
- DRAFT customer or PENDING_APPROVAL location — not offered until approved and activated.
- SUSPENDED, INACTIVE or CLOSED location — not offered for adding to routes.
Glossary
- Route — a named delivery corridor from an origin depot to a destination depot, listing the customer locations it serves.
- Origin / Destination — the branch, depot or warehouse of your own where the route starts and ends.
- Customer Location — a customer's delivery point; routes are built from these. See Customers & Locations.
- Route manager — a user assigned to look after a route; their user type must allow managing routes.
- Outside Route — the tag on a Delivery Order line in the Trip Orders table whose location isn't on the trip's route. It can still be added.
- Preferred route — a route a vehicle normally runs; used to group the vehicle dropdown on trips.
- Active route — the route of the trip a vehicle is currently assigned to; set automatically.
- Trip — the run that carries Delivery Orders on a vehicle; always planned on one route. See the Trips guide.
15. Frequently asked questions
Does the order of customer locations on a route matter?
No. A route's customer locations are a list, not a sequence. The route doesn't set the order of stops.
Can a customer location be on more than one route?
Yes. Add it to every route that serves it.
Will a route stop me adding a Delivery Order that isn't on it?
No. Orders outside the route are still offered on the trip's Trip Orders tab — they're listed after the on-route orders and carry an Outside Route tag. Clear the pre-set route filter to see them.
Can I change a trip's route after creating it?
No. The route is chosen on the first step of trip creation and is read-only afterwards. If it's wrong, cancel the draft trip and create a new one.
Why isn't my new customer showing in the route's search?
The customer must be Approved and the location must be Active. New customers start in Draft and new locations start Pending Approval — see Customers & Locations.
Do I have to set preferred routes on vehicles?
No, it's optional. It only puts the most suitable vehicles at the top of the dropdown when you assign a vehicle to a trip; every eligible vehicle can still be chosen.
Can I reactivate a deactivated route?
No — deactivation is permanent. Create a new route with the same name and add its customer locations again.